 Save
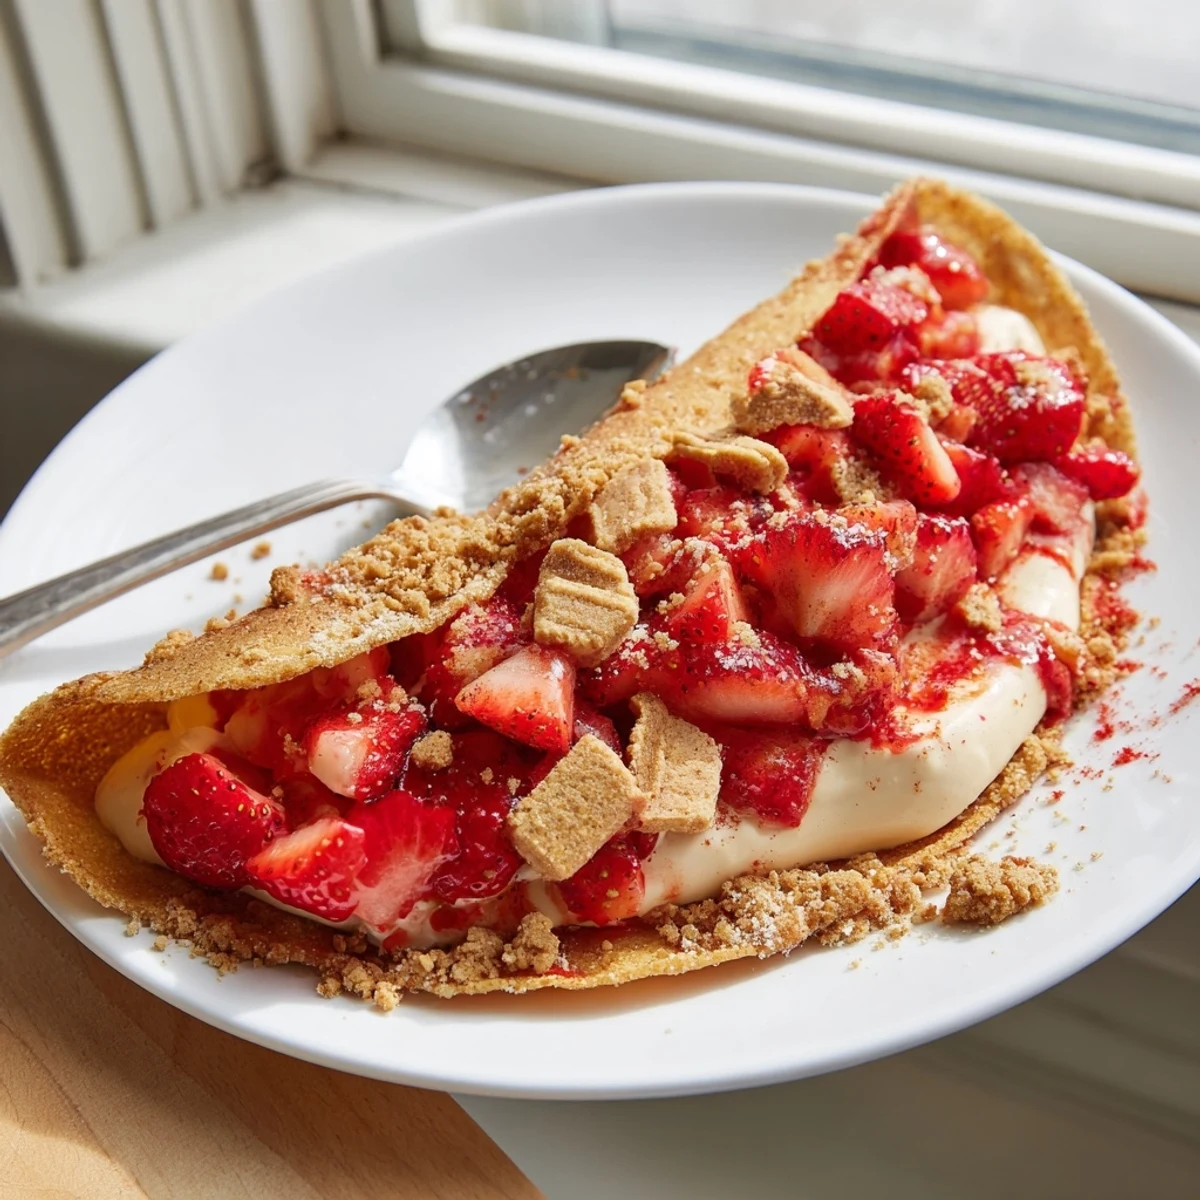
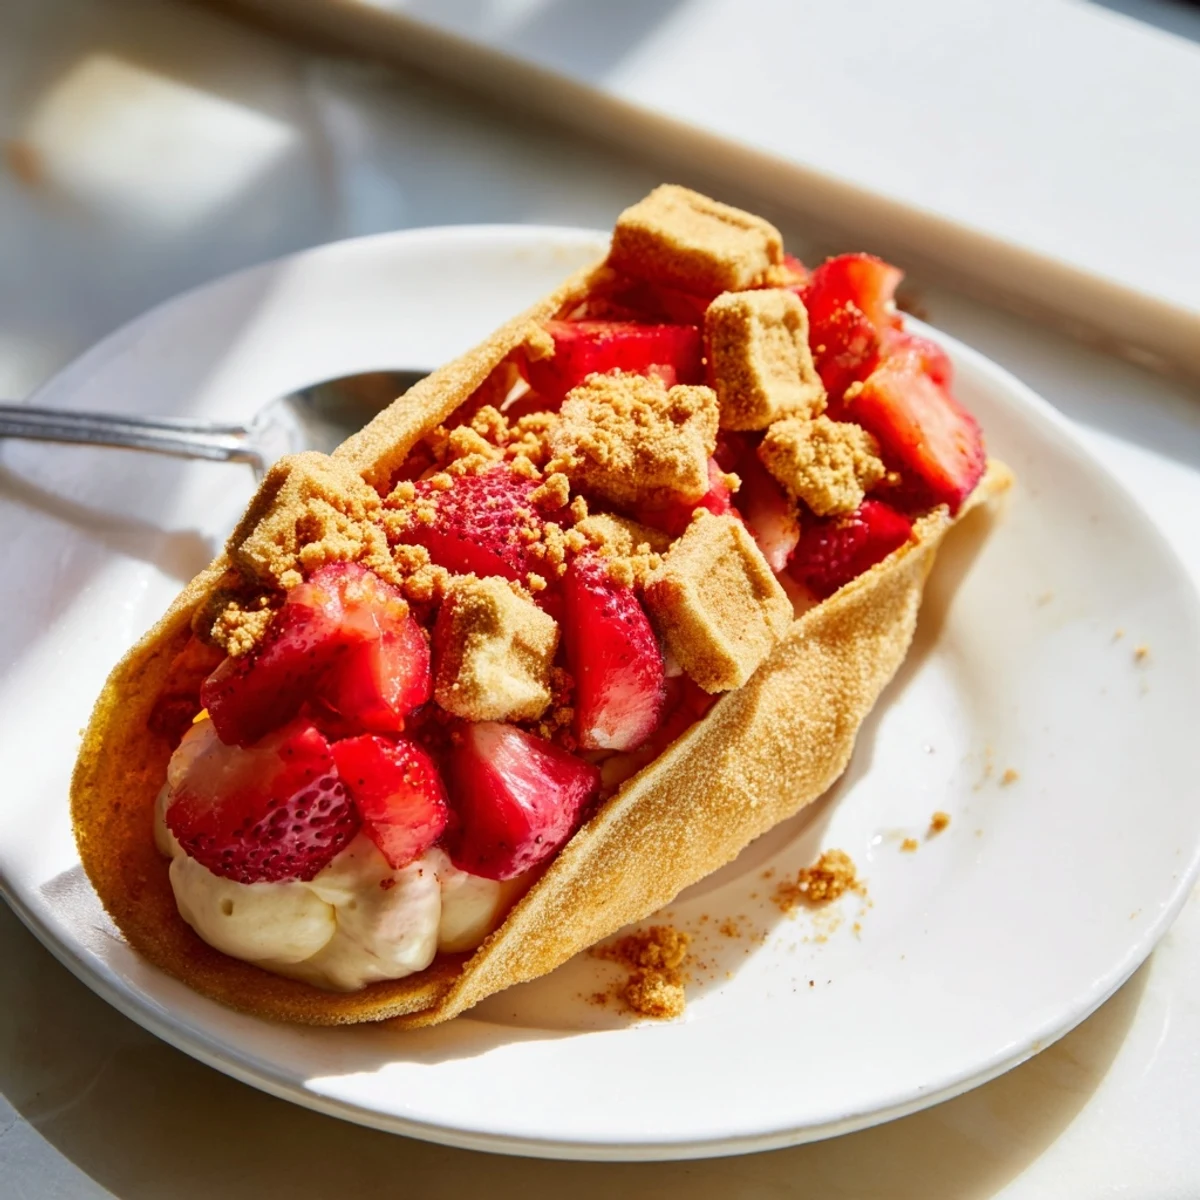
Save These playful dessert tacos transform crisp cinnamon-sugar tortilla shells into vessels for silky cheesecake filling. Fresh macerated strawberries add brightness, while a crumble of vanilla cookies and freeze-dried berries creates the perfect crunchy finish. The contrasting textures—crisp shell, smooth filling, juicy berries, and buttery crumbs—make each bite exciting.
Assembly is straightforward: shape tortillas over oven bars, bake until golden, then fill with whipped cream cheese mixture. The strawberry topping gets a quick maceration in sugar and lemon juice for maximum flavor. A final sprinkle of the crushed cookie-strawberry mixture adds essential texture contrast.
These handheld desserts shine at parties where guests can customize their portions. The shells stay crisp for hours, making them ideal for make-ahead entertaining. Pair with chilled wine or serve as the grand finale to any gathering.
The first time I served these at a dinner party, everyone paused before taking that first bite. The concept sounded so strange that I spent the entire dinner nervous they would hate it. Then someone took a bite and the whole table went quiet before bursting into laughter about how something this wrong could taste so right. Now they are the most requested dessert at every gathering.
My daughter actually helped me invent these on a rainy Sunday when we were craving something sweet but tired of the usual cookies. She was eating sugar tacos from the leftover tortilla scraps while I made cheesecake filling, and suddenly we both looked at each other with the same idea. The kitchen became a complete disaster zone of cinnamon sugar and cream cheese, but that spontaneous experiment has turned into our favorite mother daughter baking tradition.
Ingredients
- 8 small flour tortillas: Small ones work best because they hold their shape when draped over oven bars and create that perfect taco shell form
- 2 tablespoons butter, melted: Brushing both sides helps the cinnamon sugar stick and creates that extra crispy shell texture we want
- 3 tablespoons granulated sugar: Coats the shells in sweetness and gives them that beautiful golden color in the oven
- 1 teaspoon ground cinnamon: Warms up the whole dessert and pairs perfectly with both the cheesecake and strawberries
- 8 oz (225 g) cream cheese, softened: Absolutely must be room temperature or you will end up with lumpy filling no matter how much you mix
- 1/2 cup (120 ml) heavy cream: Whips the cheesecake into something lighter and fluffier than traditional dense cheesecake filling
- 1/3 cup (60 g) powdered sugar: Sweetens the filling smoothly without any gritty texture that granulated sugar would leave behind
- 1 teaspoon vanilla extract: Use the good stuff here since the flavor really shines through the creamy filling
- 1 1/2 cups (200 g) fresh strawberries, hulled and diced: Fresh berries are essential because frozen ones release too much water and make everything soggy
- 2 tablespoons granulated sugar: Draws out the strawberry juices to create that natural syrupy fruit topping
- 1 teaspoon lemon juice: Brightens the strawberries and cuts through the rich cream cheese perfectly
- 8 vanilla sandwich cookies: Golden Oreos work beautifully but any vanilla sandwich cookie will give you that buttery crunch
- 1/2 cup (40 g) freeze-dried strawberries: These are the secret weapon that adds concentrated strawberry flavor and extra crunch
- 2 tablespoons unsalted butter, melted: Binds the crunch topping together so it clings to the cheesecake instead of falling right off
Instructions
- Shape those cinnamon shells:
- Preheat your oven to 375°F and brush both sides of each tortilla with melted butter. Mix the sugar and cinnamon in a shallow dish then dredge each tortilla through until coated on all sides.
- Bake into taco form:
- Drape each tortilla over two bars of your oven rack so they hang down like natural taco shells. Bake for 8 to 10 minutes until they are golden brown and crisp to the touch, then let them cool completely on the rack.
- Whip the creamy filling:
- Beat the softened cream cheese in your mixing bowl until completely smooth. Add the powdered sugar and vanilla then mix until combined before slowly pouring in the heavy cream and beating until light and fluffy.
- Macerate the strawberries:
- Combine the diced strawberries with sugar and lemon juice in a small bowl. Let them sit for 5 to 10 minutes until they release their juices and become syrupy.
- Make the magic crunch:
- Mix the crushed cookies, freeze-dried strawberries, and melted butter together until well combined. The mixture should clump together slightly when pressed.
- Assemble your masterpiece:
- Fill each cooled taco shell with cheesecake filling using either a piping bag for precision or a simple spoon. Top generously with the strawberry mixture then sprinkle with the crunch topping and serve immediately.
 Save
Save Last summer we set up a DIY taco bar at my birthday party and let everyone build their own combinations. Watching guests carefully construct their tacos and then immediately light up at that first bite made the whole prep worth it. The kitchen floor was covered in crunch topping and three shells broke in the process, but nobody noticed because they were too busy going back for seconds.
Getting The Shell Shape Right
I have tried every method for shaping these shells from taco molds to folded foil. The oven rack technique works best because the heat circulates around the entire tortilla creating uniform crispness. Just make sure your tortillas are room temperature before draping them because cold ones can crack when folded over the bars.
Flavor Variations To Try
Once you master the basic formula, these tacos adapt beautifully to different seasons. Swap the strawberries for peaches and add graham cracker crunch in summer, or try spiced apples with an oatmeal cookie topping in fall. The cinnamon sugar shells pair with almost any fruit combination you can imagine.
Make Ahead Strategy
The shells can be made two days ahead and stored in an airtight container with a silica packet to maintain crispness. Prepare both the cheesecake filling and strawberry topping the morning of your event, keeping them chilled in separate containers. Everything comes together in under five minutes when you are ready to serve.
- Set up your toppings in small bowls so guests can see the beautiful colors
- Have extra crunch topping available because everyone wants more sprinkled on top
- Keep a few extra shells ready in case any break during assembly
 Save
Save These ridiculous cheesecake tacos have taught me that the best recipes often come from breaking rules and embracing the weird ideas. Hope they become as beloved in your kitchen as they are in mine.
Common Recipe Questions
- → How do I keep the taco shells crispy?
-
Bake the shells until completely golden and firm, usually 8–10 minutes. Let them cool fully before filling to maintain crunch. Avoid humidity or covering them—store uncovered at room temperature for up to 4 hours before assembly.
- → Can I make these ahead of time?
-
Prepare shells, filling, strawberry topping, and crunch mixture separately up to 24 hours ahead. Store shells at room temperature in an airtight container, refrigerate fillings tightly covered. Assemble just before serving for optimal texture.
- → What's the best way to shape the taco shells?
-
Drape buttered, sugared tortillas over two parallel bars of your oven rack, letting them hang like traditional taco shapes. The spacing allows even baking and creates perfect folds. Alternatively, use a taco shell mold or hang them over the oven door handle.
- → Can I use other fruits?
-
Absolutely. Raspberries, blueberries, diced peaches, or mango all work beautifully. Adjust sugar in the fruit mixture based on sweetness—ripe fruit needs less. Freeze-dried fruit in the topping should match your fresh fruit choice.
- → Why use freeze-dried strawberries in the topping?
-
Freeze-dried berries add concentrated strawberry flavor and vibrant color without excess moisture that would make the topping soggy. When crushed with cookies, they create a fruity, crunchy element that enhances both texture and taste.
- → How do I pipe the filling neatly?
-
Use a piping bag fitted with a large star tip for professional-looking results. Fill from one end of the shell to the other, using gentle pressure. If spooning, use a small offset spatula to smooth the top before adding toppings.
